Garage door springs are crucial components that bear the heavy load of your garage door, making it possible for you to open and close it smoothly. Over time, these springs wear out due to constant use, and eventually, they break. A broken spring can prevent your garage door from functioning properly, leaving your car stuck inside or your belongings exposed. Replacing a garage door spring can be a costly service if you call in a professional. However, if you’re comfortable working with tools and following safety precautions, you can learn how to replace a garage door spring on your own and potentially save hundreds of dollars.
In this guide, we’ll walk you through the steps of replacing a garage door spring like a pro. From identifying the type of spring you have to detailed instructions on how to safely remove and replace it, this article will help you handle the process with confidence. However, it’s important to remember that replacing a garage door spring involves working with high-tension components, so safety should always be your top priority.
Understanding Garage Door Springs
Before diving into how to replace a garage door spring, it’s essential to understand the different types of springs and their functions. Garage doors typically use two types of springs: torsion springs and extension springs. Knowing which type of spring your door uses will help you properly execute the replacement process.

Torsion Springs
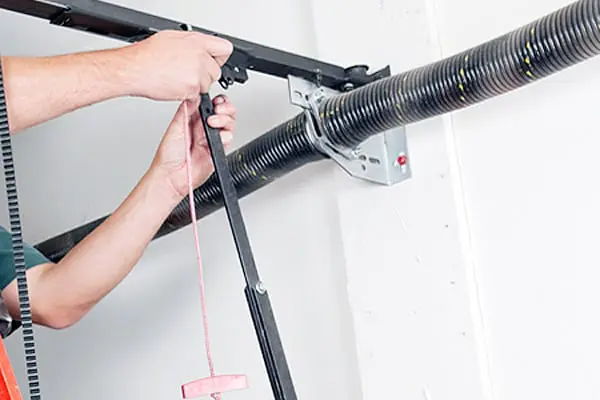
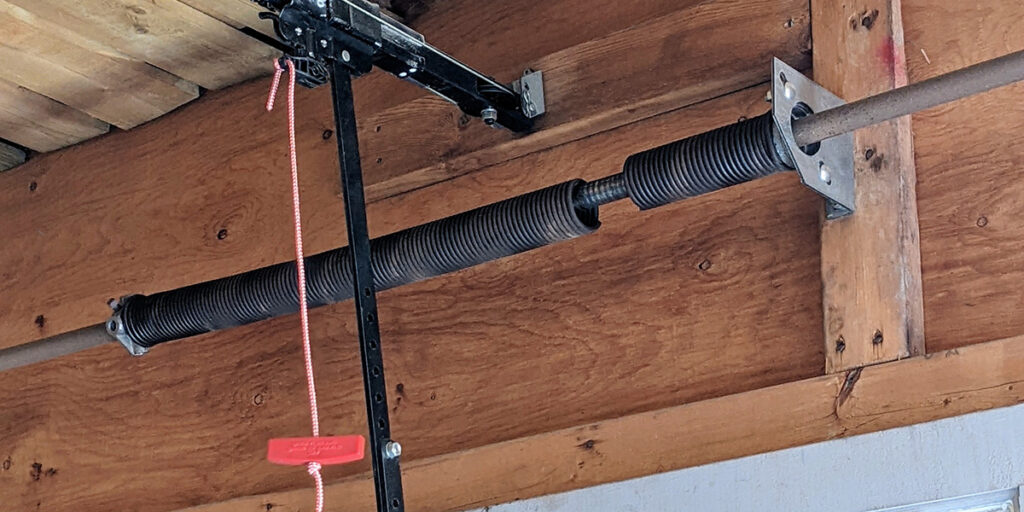
Torsion springs are mounted horizontally above the garage door. They work by winding and unwinding to lift or lower the door. These springs are more common in modern garage doors and are typically more durable than extension springs. They operate under a significant amount of tension, which makes them tricky to handle.
Extension Springs
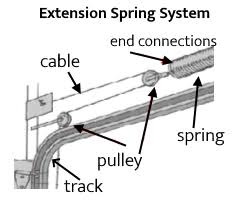
Extension springs are typically located on either side of the garage door tracks. They stretch and contract to assist in lifting the door. While extension springs are easier to replace than torsion springs, they still pose safety risks due to the high tension they carry. Extension springs are commonly found in older garage doors or single-car doors.
Tools and Safety Equipment Needed for Replacing a Garage Door Spring
Replacing a garage door spring requires some specific tools and safety equipment to ensure the job is done correctly and safely. Here’s a list of the essential items you’ll need:
Tools:
- Winding bars (for torsion springs)
- Adjustable wrench
- Socket wrench set
- C-clamps or locking pliers
- Ladder
- Tape measure
- Gloves
- Safety glasses
Safety Equipment:
Safety is paramount when replacing a garage door spring. Since garage door springs are under high tension, improper handling can lead to serious injuries. To protect yourself, wear the following safety equipment:
- Gloves: Protect your hands from sharp edges and possible snaps from the spring.
- Safety glasses: Guard your eyes from flying debris or sudden spring movement.
- Sturdy shoes: Wear closed-toe shoes with a good grip to ensure stability while working on a ladder.
Step-by-Step Guide on How to Replace a Garage Door Spring

Now that you understand the tools and safety precautions involved, let’s dive into the detailed steps of replacing a garage door spring. For this guide, we’ll cover the process for both torsion springs and extension springs, so you can follow along depending on your garage door’s setup.
Step 1: Disconnect the Garage Door Opener
Before you start working on the garage door spring, disconnect the garage door opener to prevent the door from moving while you’re working on it. This will ensure that the door doesn’t accidentally open or close while you’re replacing the spring.
Step 2: Secure the Garage Door
Once the opener is disconnected, manually lift the garage door to its fully open position. Use C-clamps or locking pliers to secure the door in place by clamping the tracks below the rollers. This prevents the door from falling while you’re working on it.
Step 3: Identify the Type of Spring
Determine whether your garage door uses torsion or extension springs. As mentioned earlier, torsion springs are mounted above the door, while extension springs are located along the sides of the garage door tracks.
Step 4: Remove the Old Spring (Torsion Springs)
For torsion springs, you’ll need to relieve the tension before removing the spring. This is done using winding bars. Insert one winding bar into the winding cone and turn it slowly to relieve tension from the spring. Once the tension is relieved, you can use a wrench to loosen the screws on the torsion tube, then slide the spring off.
Step 5: Remove the Old Spring (Extension Springs)
For extension springs, you need to release the tension by disconnecting the safety cables attached to the springs. Once the tension is released, you can remove the old spring by detaching it from the hooks on both ends.
Step 6: Measure the Old Spring
Before purchasing a new spring, measure the old spring to ensure you get the correct replacement. For torsion springs, measure the length, inside diameter, and wire size. For extension springs, measure the length of the spring when fully extended.
Step 7: Purchase the Replacement Spring
Use the measurements from the old spring to purchase the appropriate replacement. Make sure to buy a high-quality spring to ensure longevity and durability. It’s a good idea to purchase from a trusted garage door parts supplier or consult with a professional if you’re unsure of the specifications.
Step 8: Install the New Spring (Torsion Springs)
To install the new torsion spring, slide it onto the torsion tube and secure it in place with the winding cone. Using the winding bars, wind the spring by turning it in the opposite direction you used to unwind it. Refer to the spring manufacturer’s instructions to determine how many full turns are needed to properly tension the spring.
Step 9: Install the New Spring (Extension Springs)
For extension springs, attach the new spring to the same hooks where the old spring was connected. Reattach the safety cables, ensuring that they run through the center of the spring to prevent it from flying off if it breaks in the future.
Step 10: Test the Garage Door
After installing the new spring, remove the clamps from the tracks and reconnect the garage door opener. Test the door by opening and closing it a few times to ensure it operates smoothly. Pay close attention to how the door moves—if it seems unbalanced or difficult to operate, you may need to adjust the spring tension.
Maintenance Tips to Extend the Life of Your Garage Door Springs

Garage door springs are essential to the smooth operation of your garage door, but over time they can wear out, leading to costly repairs or replacements. Regular maintenance can significantly extend the life of your garage door springs and help you avoid frequent replacements. Here are some tips to ensure your springs remain in good condition:
1. Lubricate the Springs Regularly
- Applying garage door lubricant to the springs at least every six months can reduce friction and allow them to function more smoothly. Proper lubrication also helps protect the springs from rust and corrosion, which can shorten their lifespan. Use a spray lubricant specifically designed for garage doors and apply it to the springs, as well as other moving parts such as hinges and rollers. Avoid using thick grease, as it can attract dust and dirt, causing more harm than good.
2. Inspect the Springs for Wear and Tear
- Regular inspection of your garage door springs can help identify signs of wear before they lead to major problems. Look for rust, corrosion, or gaps between the coils, which are indicators that the spring is weakening. If you notice these signs, consider scheduling a professional checkup to assess whether the springs need to be replaced. Catching these issues early can prevent sudden spring failure, which could cause the door to stop working altogether.
3. Check and Maintain the Door’s Balance
- An unbalanced garage door puts extra stress on the springs, causing them to wear out faster. To check the balance, disconnect the garage door opener and manually lift the door to about halfway. If the door stays in place, it’s properly balanced. However, if it starts to fall or rise on its own, the springs may need to be adjusted. An unbalanced door should be corrected by a professional, as improper adjustments can lead to additional wear on the springs or damage to other parts of the garage door system.
4. Limit Garage Door Use
- The more you use your garage door, the more cycles the springs go through. Since garage door springs are designed to last for a certain number of cycles (usually around 10,000 cycles, where one cycle equals one opening and closing), limiting unnecessary use can extend their lifespan. Try to reduce the number of times you open and close the garage door each day, especially if you have alternative entryways into your home.
5. Avoid DIY Adjustments or Repairs
- While some maintenance tasks can be done on your own, avoid attempting to adjust or repair the garage door springs unless you have proper experience. Garage door springs are under high tension and can be dangerous to work with, especially torsion springs. A mistake in handling them can lead to serious injury. It’s best to leave spring adjustments or replacements to professionals who have the right tools and expertise.
Common FAQs About How to Replace Garage Door Spring
Can I replace a garage door spring myself?
- Yes, but it’s risky. While you can replace a garage door spring yourself if you have the necessary tools and take all safety precautions, it is a challenging task. Springs are under a lot of tension and mishandling them can result in serious injury. Torsion springs in particular are dangerous to work with. If you’re not experienced or confident, hiring a professional is strongly recommended.
2. How long do garage door springs typically last?
- Garage door springs typically last between 7 to 12 years or around 10,000 cycles (a cycle being one complete opening and closing of the door). However, this lifespan can vary depending on how often you use your garage door. Regular maintenance, such as lubrication and balance checks, can also extend their lifespan.
3. How much does it cost to replace a garage door spring?
- The cost to replace a garage door spring usually ranges from $150 to $350. This price includes both the spring itself and the labor, if you hire a professional. The cost may vary depending on the type of spring (torsion springs are more expensive than extension springs), the size of your garage door, and local labor rates. DIY replacement may save you on labor costs, but the risks involved often make professional replacement the better option.
4. What are the signs of a broken garage door spring?
- Signs of a broken spring include:
- The garage door won’t open or only opens a few inches before stopping.
- You hear a loud bang when the spring breaks.
- The door appears unbalanced or is harder to lift manually.
- Visible gaps between the coils of the spring. If you notice any of these signs, it’s important to stop using the garage door immediately and call a professional for a spring replacement.
5. Can I replace just one garage door spring?
- Yes, you can replace just one spring, but it’s generally recommended to replace both springs at the same time. Springs work in pairs and have roughly the same lifespan. If one spring has broken, the other is likely near the end of its life as well. Replacing both at the same time ensures balanced tension and prevents another spring failure in the near future.
Conclusion
Replacing a garage door spring is a challenging but manageable DIY project if you take the proper safety precautions and have the right tools. By following this step-by-step guide on how to replace a garage door spring, you can potentially save hundreds of dollars compared to hiring a professional. However, always keep in mind that garage door springs are under high tension, and if you’re unsure of any part of the process, it’s better to consult a professional to avoid injury.
For expert assistance with garage door spring replacement, contact Primos Garage Doors. Our experienced technicians can safely replace your garage door springs, ensuring your door operates smoothly and securely.
End Note
Primos Garage Doors offers top-quality, affordable garage door services to enhance your property’s safety and appearance. We uphold the highest standards of integrity and efficiency in every service, ensuring superior customer satisfaction. Focusing on both residential and commercial sectors, we strive to strengthen community bonds and deliver reliable, high-quality services tailored to meet specific needs. Learn more about us on our about page, explore our service areas in Brighton, and view our photo gallery for examples of our work. Check out our reviews to see what customers are saying about us, or contact us for emergency garage door repair, residential garage door services, or commercial garage door solutions. For more tips and advice, visit our blog or contact us today!


